My Blog List
Thursday, December 12, 2013
This and that.
I pretty much used up all of the paper from this 6" pad of Authentique. I have a few scraps left. I had to go into my stash to find the dark green paper for the last card. I mixed together the papers and stamps and ended up with 18 cards. The bird and the cat are both from Inkadinkadoo. The miss you stamp is a very old SU stamp. The big circle sentiment is a digi from Create With TLC
Tuesday, December 10, 2013
Tutorial for stamp set envelope
I got tired of putting my stamp sets in CD containers. They are fine for single stamps and unmounted stamps but I now have about 100 cases and I am running out of room. I long ago started keeping my sets in the original packages but as you know they are prone to tearing. I put the sets that would fit into Avery Elle stamp storage envelopes and I love them but they are too short for some sets including Inkadinkadoo.
I have an abundance of Avery Premium Heavy Weight sheet holders. I also have a Staples brand my daughter gave to me but they are a lighter weight. I tried both and the Avery brand is much nicer.
Using your cutter cut 4" from the top open edge. I also trimmed off the edge a little where the holes are.
Using your ruler and a Sharpie pen make a nice heavy line at the 5" mark. You need to be able to see it for one of the steps.
On the open top edge cut at an angle to the fold mark.
Using the 5" ink mark as a guide line use scissors to cut off from ONLY the ink marked side.
Fold the leftover flap to the cut off edge. After you insert your stamp set, with some cardstock as backer, you can tuck the flap in. I trimmed off and used the original backing from this set because it has the name of the stamp set on it.
I have a nice plastic basket from Walmart that is just the right size that
I put my stamps in so all I have to do is flip through them and pull out only the one I want.
Tuesday, December 3, 2013
Warm thoughts.
In a recent online order I received free a pack of 12 Pink Paisley journal cards. They all had butterflies. I used six of the cards by stamping a sentiment on them. I covered all of the butterflies with Diamond Glaze. These are going out in a few days in my last OWH box of the year.
Thursday, November 14, 2013
Cocoa time
The snow flakes are embossed as part of the original paper.
The next 2 cards also have a lot of pre embossed glitter.
Image is a colored digi from The Paper Shelter. I am trying to use paper I have had for years. I made 14 cards with this image.
Monday, October 28, 2013
Halloween personal cards
Image is a Hambo Stamps digital image colored with Copics. I added a couple of Recollections jeweled brad bats.
Witch is Inkadinkadoo stamp stamped on watercolor look paper
Image is a Tiddly Inks digital image colored with Copics. The bat is covered with Diamond Glaze. On her hair and around the edge of the die cut I used a purple Spica glitter pen. The entire green background is a designer sheet of paper.
I stamped a Bo Bunny image in green and then did some coloring with Twinkling H2os. I added some crystal lacquer to his eyes. I mounted him to Tim Holtz grunge paper, cut him out and popped him up. The background is designer paper.
.
This image is a layered chipboard I have had for ages. It's pretty cute. I added some fun fibers because it is for a 3 year old.
A big chipboard spider I painted with Twinkling H2os
A chipboard bat. I added some gems for his eyes.
Colored with Copics. The top portion of the cakes are covered with Diamond Glaze.
This last one is a digital image.
I hope you enjoyed my cards. I made a total of 17. Most are for my family. Some for friends. I would have liked to have made more for my friends but I waited until the last minute.
I love Halloween. I enjoy all of the little kids and even the teenagers. I love them all dressed up and I love them when they don't dress up. Last year we had about 100 kids. I have Rice Krispy Treats to give out. I opened 1 box already. I had too. I ate all of the plain ones and left the flavored to give away. I don't like them so much. My oldest daughter and her 20 year old daughter will be here to help give out the treats. The granddaughter will be dressed in costume. We always have a good time.
Saturday, October 19, 2013
Sending you a smile
Wednesday, October 16, 2013
Winter Wishes
The OWH midweek throw down is for a winter card. I posted this on Facebook but decided I would also blog it.
I used a precolored digi from The Paper Shelter. For the parts with snow I used a glaze pen to make it pop. The blue paper is from Bo Bunny. The sentiment is an Imaginisce stamp stamped with Brilliance Pearlescent Sky Blue Ink. The ribbon is May Arts wrinkle ribbon. The bottom embossed section is done with pearlescent paper
Wednesday, October 9, 2013
Love is in the air
Last week I made 6 of this card for OWH. Very much a card for a young girl. The pink paper is shiny and the green is entirely built in glitter gloss paper. Because ATG doesn't always stick when glossy paper is underneath, I used brads to hold the top layer to it. I had another look at this card. It wasn't on the card base yet. I added a pink Prima flower under the brad on the top left. That is what my little grand daughter would tell me it needed. And ribbons too. lol And maybe some jewels.
From one sheet of this Best Creations dinosaur paper I managed to make 9 cards by chopping it into images. The striped paper is from the same line. I am sure you can see that there is a lot of built in glitter embossing on this paper. On 3 of the cards I had scraps that I was able to cut a dinosaur from and pop up. This is my contribution for little boy cards.
I now have 27 card fronts that need to be mounted onto bases. I guess I will do that today before I start another card.
Thursday, October 3, 2013
Multiply the fun-Midweek Throwdown
The OWH mid week throw down was to make multiples. Our samples were provided by Pam T. The design for my cards is a CASE from Pam. She was kind enough to give the measurements. The first card is like hers.The first 2 cards were sent out in a box earlier this week. I made a few of each. The last card I am ready to mount onto the base. I have 12 of these. The patterned paper is Bo Bunny. The first 2 cards I used Basic Grey papers.
Saturday, September 28, 2013
Christmas in September
The top 2 cards were made using Bo Bunny papers. The card that says Joy, I stamped some pale green snowflakes. There is green in the lighter colored layer but it got covered up. The card that says Noel I stamped snowflakes on pearlescent paper using Distress Ink. The stamps are Inkadinkadoo. I added a few crystals on both cards. I made 2 of each.
The bottom card was made using the QuicKutz A2 template. The paper is by Bazzill
Wednesday, September 18, 2013
Peace on Earth
In my eye this is ugly paper. I forced myself to use it. It does have some built in gloss embossing to give it a little bling. It is from a small pad of paper, DCWV I am thinking. On the 2 cards with red I backed up the sentiment with antique gold foil paper. I did 3 of each card. The entire time I was making them I told myself these will make a nice card to send to a guy.
Be gone ugly paper!
Monday, September 16, 2013
Cocoa to warm you up
Same colored digital image from The Paper Shelter. Different papers from Powder Mountain Collection Bo Bunny. The snowflake and the embossed snow are done in white pearlized paper.
Tuesday, September 10, 2013
Holiday lights
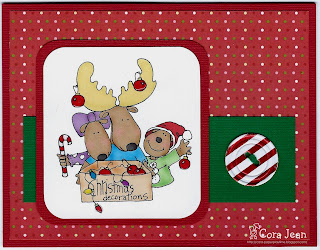
I have a couple of versions using this Dollie Dears digi. I used Diamond glaze on the bulbs to give them a popped up shiny look. The bulb strip on the first card is from a pack of Martha Stewart strips I bought 2 or 3 years ago. I used a button die to make the button on the second card. The paper is shiny and very fancy. Hard to use on a card but it made beautiful buttons.
I have a ton of green cardstock. After mounting all of the images on green I did not like the color at all. Pulled them all off and mounted them on red. I finally managed to find 1 sheet of what I call Christmas green and used it to cut some strips for 8 cards. I now have 12 card size pieces of green waiting for another project I guess.
Penny Black Wistful
I used this Penny Black stamp 3 different ways. The black and the blue image have coloring with Copic Markers. The middle one was done on water color look paper. All 3 have a Swarovski crystal on the cheek. The flowers on the blue card and the black card I used a glaze pen on the flowers to give it a little bling.
Wednesday, September 4, 2013
I miss your Face
I made a half dozen of these cards all looking a little different. I followed the design of the curved stripe paper to cut. Both papers are from the same Basic Grey line.
Friday, August 30, 2013
Tutorial using A2 nested template
I was asked to do a tutorial on making this card.
I used the QuicKutz A2 nesting template. It has 17 dies.
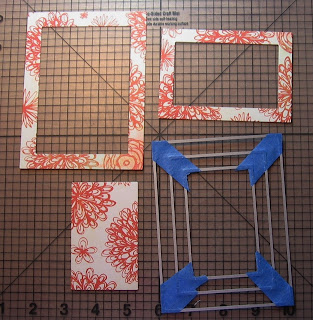
I fastened together with blue painters tape these templates
2"x3&1/4
3x4&1/4
4x5&1/4
I trimmed the tape a little and dusted what was sticky with my embossing buddy.
The templates I used to cut the solid stock were 1/4" larger than the original templates. When the frame is mounted you have a 1/8" edge. There is a template for the large brown piece which I didn't use. My brown cardstock is already cut to A2 size.
That's it folks! The hardest part is mounting it so you have even edges. The biggest frame is the hardest because it is floppy and doesn't do what you want it to do.
I have now made a few of these. The 2 largest frames are wobbly to mount. I cut from very light weight cardstock 2 uncut (not frames) pieces. I put adhesive on the wrong side of the frame, lay it face up and apply the solid light weight piece in top. It gives the frame some stability when you start layering.
Tuesday, August 20, 2013
ODBD August challenge
The August ODBD challenge for OWH was to use pink, brown and green. I used both sides of designer paper from SEI.
Monday, August 19, 2013
Autumn birds
I made several cards using this Bugaboo digital image. Used my Copics to color. Used papers I have had for years. At least 1 sheet said 2008.
Subscribe to:
Comments (Atom)


.jpg)


