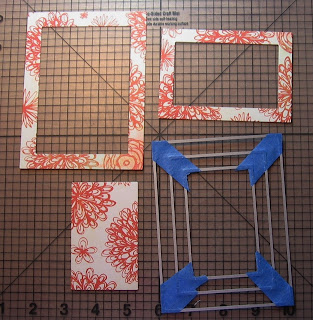
I was asked to do a tutorial on making this card.
I used the QuicKutz A2 nesting template. It has 17 dies.
I fastened together with blue painters tape these templates
2"x3&1/4
3x4&1/4
4x5&1/4
I trimmed the tape a little and dusted what was sticky with my embossing buddy.
The templates I used to cut the solid stock were 1/4" larger than the original templates. When the frame is mounted you have a 1/8" edge. There is a template for the large brown piece which I didn't use. My brown cardstock is already cut to A2 size.
That's it folks! The hardest part is mounting it so you have even edges. The biggest frame is the hardest because it is floppy and doesn't do what you want it to do.
I have now made a few of these. The 2 largest frames are wobbly to mount. I cut from very light weight cardstock 2 uncut (not frames) pieces. I put adhesive on the wrong side of the frame, lay it face up and apply the solid light weight piece in top. It gives the frame some stability when you start layering.


8 comments:
Thanks so much! Now I see there are three dark and three patterned pieces. It'll be great to see what else you come up with as you use these dies.
Really neat! Thanks so much for taking the time to do this.
so pretty, I have yet to try this... have you seen that new alignment tool they have so that you can do I think it is 1/4 inch to an inch layers, thinking I might have to get that :)
Cora this is awesome! Now it all makes sense!
Thank you!
Cora Jean you are so smart! TU for tutorial, love your cards and you!
Sizzix has a new magnetic platform too that is great for the dies. Holds them where they are suppose to be. I just ordered me one....
Cora you did a great job on this project.
Excellent tutorial and beautiful card, Cora!
Post a Comment